Menus
There are a number of commands that can be chosen from the menus in the menu bar which are described below.
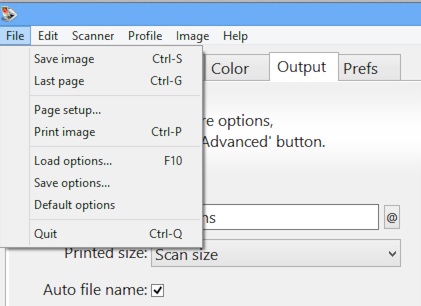
- File | Save image
- File | Save image+
- File | View
- File | Page setup
- File | Print image
- File | Load options
- File | Save options
- File | Default options
- File | Quit
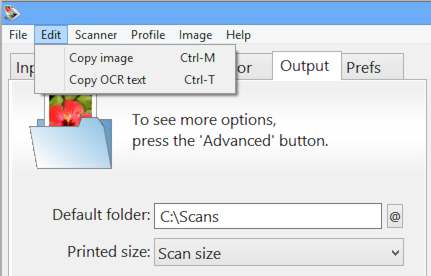
- Edit | Copy image
- Edit | Copy OCR text
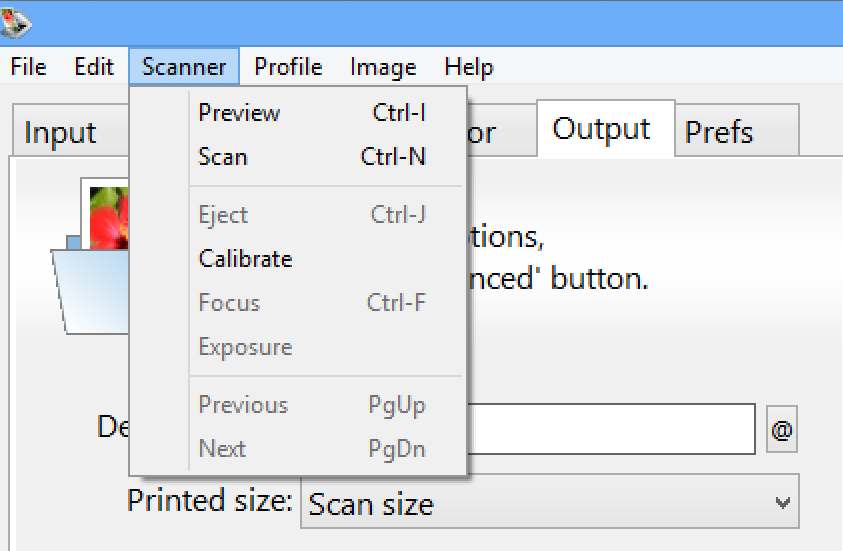
- Scanner | Preview
- Scanner | Scan
- Scanner | Scan+
- Scanner | Eject
- Scanner | Calibrate
- Scanner | Focus
- Scanner | Exposure
- Scanner | Find scanners
- Scanner | Previous
- Scanner | Next
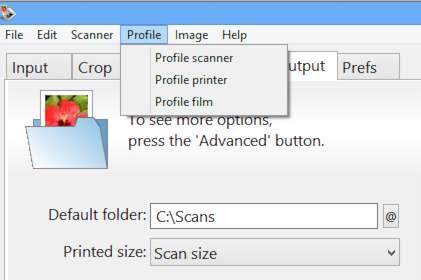
- Profile | Profile scanner
- Profile | Profile printer
- Profile | Profile film
- Image | Zoom In
- Image | Zoom Out
- Image | Rotate left
- Image | Rotate right
- Image | Flip
- Image | Mirror
- Image | Release memory
- Image | Graph off
- Image | Graph raw
- Image | Graph b/w
- Image | Graph curve
- Image | Graph image
- Help | Support
- Help | Manual
- Help | Tips
- Help | Release Notes
- Help | Update
- Help | Uninstall
- Help | About
File | Save image
Same as pressing the Save button.
File | Save image+
Same as pressing the Save+ button.
File | View
Same as pressing the View button.
File | Page setup
This command lets you control how the scanned image is placed on the printed page.
File | Print image
This command prints the current preview or scan.
File | Load options
This command lets you load the current options settings from a file.
File | Save options
This command lets you save the current options settings to a file.
File | Default options
This command sets all options for the current scanner and scan mode to their default values.
File | Quit
This command causes VueScan to exit. The current option settings will be saved to vuescan.ini.
On Mac OS X, this command is in the VueScan menu.
Edit | Copy image
This command copies the current image to the clipboard.
If you’ve created a preview but not a scan, the section of the preview inside the crop box is used, otherwise the most recent scan is used.
Edit | Copy OCR text
This command is for Optical Character Recognition (OCR) on the current image and copies the text to the clipboard.
You need to set Input | Media to “B/W text” for this to work.
If you’ve created a preview but not a scan, the section of the preview inside the crop box is used, otherwise the most recent scan is used. However, if
Input | Preview resolution is set to “Auto” or something less than 300 dpi, this may not work very well.
Scanner | Preview
Same as pressing the Preview button.
Scanner | Scan
Same as pressing the Scan button.
Scanner | Scan+
Same as pressing the Scan button.
Scanner | Eject
Ejects film from a film scanner or paper from a document feeder.
Scanner | Calibrate
This command causes a scanner calibration on those scanners that support it. Generally, calibration compensates for three things:
- Lighting is usually uneven from one side of a scan to another
- Each CCD element has a slightly different sensitivity to light
- The dark voltage level of each CCD element is slightly different
When properly calibrated, the scanner should theoretically produce the same values for each pixel, if an image that is a single tone and color were scanned.
Sometimes the calibration data gets stored inside the scanner memory, sometimes it’s done once for every scan and sometimes VueScan stores the calibration data in a file when the “Scanner | Calibrate” command completes.
If you’ve got one or two narrow streaks appearing in the scan direction, try doing a scan with the scanner turned on its side. This can dislodge particles from the light path.
Scanner | Focus
This command focuses the scanner. The center of this focus area is displayed on the preview with a small circle with ‘Focus’ inside, and can also be changed with the Crop | Focus X offset and Crop | Focus Y offset options (options displayed only when the scanner is capable of this).
Scanner | Exposure
This command computes the optimal values for Input | RGB exposure and Input | Infrared exposure. It uses the pixels inside the crop box in the Preview tab to compute these values.
Scanner | Find scanners
This command searches the network for scanners that have been added or removed since VueScan started. It also searches for Firewire and SCSI scanners that have been added or removed.
Scanner | Previous
Decreases Input | Frame number by 1.
Scanner | Next
Increases Input | Frame number by 1.
Profile | Profile scanner
See the section in this Manual describing ICC profiling of scanners, printers and film.
Profile | Profile printer
See the section in this Manual describing ICC profiling of scanners, printers and film.
Profile | Profile film
See the section in this Manual describing ICC profiling of scanners, printers and film.
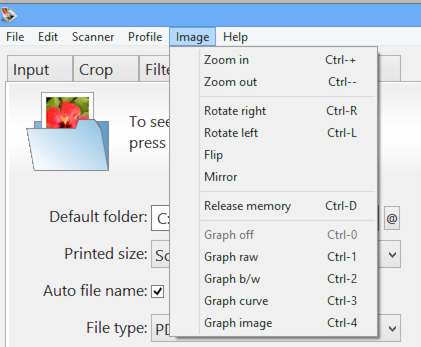
Image | Zoom In
Same as pressing the Zoom In button.
Image | Zoom Out
Same as pressing the Zoom Out button
Image | Rotate left
Rotates the image 90 degrees counterclockwise
Image | Rotate right
Rotates the image 90 degrees clockwise
Image | Flip
Rotates the image 180 degrees
Image | Mirror
Mirrors the image left to right
Image | Release memory
This command releases the memory used by VueScan to store the most recent scans and previews. This can be useful if you need more memory for another program.
Image | Graph off
This command turns off any image graph that’s being displayed.
Image | Graph raw
This command displays a histogram of the intensities of the raw scan data.
Image | Graph b/w
This command displays a histogram with the black/white points.
Image | Graph curve
This command displays the current correction curve.
Image | Graph image
This command displays the histogram of the current image after correction by the black/white points and the curve.
Help | Support
This command starts a web browser showing the VueScan Support pages.
Help | Manual
This command starts a web browser showing the VueScan Manual.
Help | Tips
This command displays tips for using VueScan.
Help | Release Notes
This command displays the Release Notes for the current version of VueScan. These include changes from previous versions, notes for Windows, Mac OS X and Linux and instructions for uninstalling VueScan.
Help | Update
This command lets you download the latest version of VueScan if a newer version is available.
Help | Uninstall
This command is only used on macOS.
To uninstall VueScan on Windows, use the Apps control panel. To uninstall VueScan on Linux, use the standard uninstall used for .deb or .rpm files.
On macOS, this removes the vuescan.ini, vuescan.log and vuescan.csv files, and deletes the folder they’re in (if empty). This doesn’t delete any .ini files you’ve created.
On macOS, the VueScan Photoshop plugin will be removed and the TWAIN data source will be removed.
Help | About
This command displays the version number and three boxes for entering your e-mail address, serial number and customer number from the purchase receipt.
This command is in the VueScan menu on Mac OS X and is in the Help menu on Windows and Linux.
The e-mail address, serial number and customer number are saved in:
   Mac OS X:                /Users/yourname/.vuescanrc

   Linux                    ~/.vuescanrc

   Windows XP and earlier:  Registry HKEY_CLASSES_ROOT\VueScan\license

   Windows Vista and later: Registry HKEY_CURRENT_USER\Software\VueScan\license
If you’re running VueScan as Administrator when you enter the serial number, then the e-mail address, serial number and customer number will be saved to the following location also. This lets all users share the same serial number.
   Mac OS X:                /Users/Shared/.vuescanrc (if writable)

   Linux                    /etc/.vuescanrc (if writable)

   Windows Vista and later: Registry HKEY_LOCAL_MACHINE\Software\VueScan\license
On Mac OS X, if you want all users to have the same serial number, you can manually move this file to either of these files:
   /Library/Application Support/VueScan/.vuescanrc
   /Network/Library/Application Support/VueScan/.vuescanrc