Color Tab
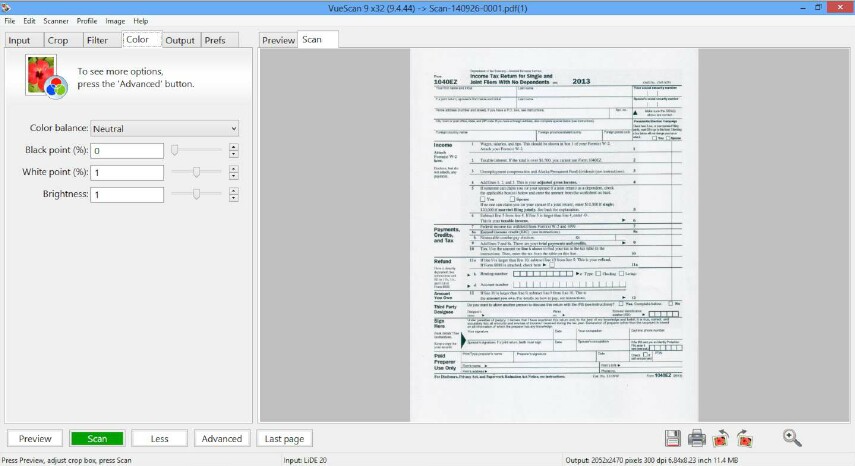
This tab is used to control the colors of the preview and scan. It lets you specify film type, film base color, image brightness, color balancing, black and white points and color space.
- Color | Color balance
- Color | Neutral red/green/blue
- Color | Black point (%)
- Color | Black point red/green/blue
- Color | White point (%)
- Color | White point red/green/blue
- Color | Threshold
- Color | Invert
- Color | Curve low/high
- Color | Brightness
- Color | Brightness red/green/blue
- Color | Film base color red/green/blue
- Color | Slide/Negative/B/W vendor/brand/type
- Color | Scanner/Printer/Film/Output/Monitor color space
- Color | Scanner/Printer/Film/File/Monitor ICC profile
- Color | Scanner/Printer/Film ICC description
- Color | Scanner/Printer/Film IT8 data
- Color | Show IT8 outline
- Color | View color
- Color | Pixel colors
- Color | Clipped black color
- Color | Clipped white color
- Color | Out of gamut color
- Color | Infrared defect color
- Color | All frames
Color | Color balance
Use this option to set the type of color balance you want for each image. The default setting of White Balance is appropriate for typical lighting conditions. See the topic “Adjusting Color Balance” for general guidance on using Neutral and Auto levels to handle these cases if White Balance is not right.
None
The black and white points aren’t used at all, and the image is only corrected for the CCD’s color response (if the Media option is set to Image) or by the film’s color response. This image is gamma corrected.
Manual
Both the black and white points are used to stretch the image’s intensity range. However, the relative ratios of red, green, and blue are specified manually.
Neutral
Both the black and white points are used to stretch the image’s intensity range. However, the relative ratios of red, green, and blue are kept constant.
Tungsten
Both the black and white points are adjusted to compensate for an image lit by tungsten light (i.e. a normal incandescent light bulb). This removes the reddish cast from indoor pictures taken without a flash.
Fluorescent
Both the black and white points are adjusted to compensate for an image lit by fluorescent light. This removes the greenish cast from indoor pictures lit by fluorescent lights or lit by flash.
Night
Both the black and white points are adjusted to compensate for an image taken at night. The white balance is determined from the darkest 10% of the image, which often produces the best results when images have bright fluorescent or incandescent lights that are greenish or yellowish.
Auto levels
This is a simple mapping of the darkest color to 0.00 intensity and the brightest color to 0.95 intensity.
White balance
VueScan analyzes the image and adjusts it to make neutral colors appear more neutral.
Landscape
VueScan analyzes the image and adjusts it to make neutral colors appear more neutral, and sky blue and green foliage colors more lifelike.
Portrait
VueScan analyzes the image and adjusts it to make neutral colors appear more neutral and skin tones more lifelike.
Standard Option: This option is displayed when when Input | Lock image color isn’t set.
Color | Neutral red/green/blue
This option is normally set by clicking with the right mouse button on a neutral color in the image.
Professional Option: This option is displayed when Input | Lock image color isn’t set, and when “Color | Color balance” is set to “Manual”.
Color | Black point (%)
The black point is used by the color balance algorithm and is computed by using the histogram of each color in the image. Use this option to leave the black point at the minimum intensity (0%), or to choose the black point such that some percentage of the pixels in the image are below the black point.
The default black point is 0. Setting a higher value will cause tones close to black to become pure black, which can improve contrast. However, setting the black point too high will cause shadow detail to be lost.
Standard Option: This option is displayed when “Color | Color balance” is set and Input | Lock image color isn’t set.
Color | Black point red/green/blue
This option lets you set the black point manually. Note that these values are in linear space, not gamma corrected space, so the only practical way to use these values is to use the Input | Lock image color option.
Professional Option: This option is displayed when Input | Lock image color is set.
Color | White point (%)
The white point is used by the color balance algorithm and is computed by using the histogram of each color in the image. Use this option to leave the white point at the maximum intensity (0%), or to choose the white point such that some percentage of the pixels in the image are above the white point.
The default white point is 1% (that is, the brightest 1% of pixels are all converted to pure white). Setting a higher value will cause tones close to white to become pure white. This can improve contrast and overall intensity of the image. Setting the white point too high will cause details in areas of highlights (e.g. the gray puffs of a cloud) to be lost, making the image look flat.
Standard Option: This option is displayed when “Color | Color balance” is set and Input | Lock image color isn’t set.
Color | White point red/green/blue
This option lets you set the white point manually. Note that these values are in linear space, not gamma corrected space, so the only practical way to use these values is to use the Input | Lock image color option.
Professional Option: This option is displayed when Input | Lock image color is set.
Color | Threshold
Use this option to change the brightness of text scans.
Standard Option: This option is displayed when scanning one bit per sample.
Color | Invert
Use this option to invert black and white when scanning text using white letters on a black background.
Professional Option: This option is displayed when scanning one bit per sample.
Color | Curve low/high
Use these options to change the shape of the curve that’s applied after the black/white point is applied.
Decrease the low value to see more detail in the black parts of the image, and increase the high value to see more detail in the white part.
You can set Prefs | Graph type to “Curve” to see the curve, and can move the triangles under the curve to change these values.
Double-click on the graph of the curve to reset these options to their default values.
Professional Option: This option is always displayed.
Color | Brightness
Use this option to increase or decrease the overall image brightness.
VueScan’s brightness is effectively a multiplier of the gamma of the color space.
Standard Option: This option is always displayed.
Color | Brightness red/green/blue
Use these options to increase or decrease the red/green/blue image brightness. Note that this is a gamma multiplier, where 1.0 is the default setting.
Professional Option: This option is always displayed.
Color | Film base color red/green/blue
This option displays values for the base color of the film, and can be edited. These options, which are usually set automatically, are available if Input | Lock film base color is selected.
This is primarily useful if you’re scanning a series of negatives or slides from the same roll of film as its base color will always be the same.
Professional Option: This option is displayed when Input | Media set to a film type and when Input | Lock film base color is set.
Color | Slide/Negative/B/W vendor/brand/type
Use these options to set up the film type for various settings for the Input | Media option.
Choose the appropriate vendor, brand and type from the list. Examine the edge of the film around the sprockets to determine the type.
If your film is not listed, the generic option is often a good choice.
Standard Option: This option is displayed when Input | Media is set to a film type.
Color | Scanner/Printer/Film/Output/Monitor color space
Use these options to set the color space. A color space is a combination of color primaries and white point. For most situations, the default color space is probably best.
Color spaces are used to provide a well-known standard that ensures a given color is the same in one medium (e.g. the display monitor) as it is in others (e.g. printed output). If you use specific color spaces, you must ensure that all other software, printing, etc. that operates on that source uses the same color space. Color spaces are an advanced topic – use them only if you understand and need them.
The Scanner color space is the color space used by a scanner, raw scan file or raw digital camera file. It is also the name of the ICC file that gets written when “Profile | Profile scanner” is chosen. There are two options for Scanner color space - built-in, which is the color space of a pre-profiled scanner, and “ICC profile”, which is an ICC profile produced by the “Profile | Profile scanner” command.
The Printer color space is used to control how the colors look when they are sent to your printer. You should normally use the default setting unless you’re profiling your printer.
The Film color space is an advanced option for adjusting for the color of film stocks.
The Output color space is used when writing images to JPEG, TIFF, PDF and Index files.
Note that if you use the Apple RGB, ColorMatch RGB, ProPhoto RGB or ECI RGB color space, the image gamma will be 1.8. If you use any other color space, the image gamma will be 2.2.
You can change the image gamma by using the “Color | Image brightness” option. This is a multiplier of the gamma of the color space chosen.
The Monitor color space is the color space used to display images in the Preview and Scan tabs. The default value is usually correct for most systems.
Professional Option: This option is always displayed.
Color | Scanner/Printer/Film/File/Monitor ICC profile
If you set this option to “ICC profile”, you can specify the name of an ICC profile.
The Scanner, Printer and Film ICC profiles are normally read-only, but will also be written when the “Profile | Profile scanner/printer/film” commands are used.
Professional Option: This option is displayed when the color space is set to “ICC profile”.
Color | Scanner/Printer/Film ICC description
Use this option to add a description to the ICC profile when it’s created. This description is used by programs like Photoshop(TM) to identify a profile.
Professional Option: This option is displayed when the color space is set to “ICC profile”.
Color | Scanner/Printer/Film IT8 data
Every IT8 or Q60 target has an associated data file that describes the measured color at each square in the target. This file is read when the “Profile | Profile scanner” command is used. If you don’t have a data file for your target, the default IT8 target colors will be used.
Professional Option: This option is displayed when the color space is set to “ICC profile”.
Color | Show IT8 outline
When this option is enabled, a grid is overlaid over the crop box showing where the IT8 target locations are. Note that this grid only outlines the grey bar at the bottom of the target and the first 19 columns of the color boxes.
Professional Option: This option is always displayed.
Color | View color
Use this option to view all three color channels normally (“RGB”) or to view the red, green, blue or infrared channel alone.
The default value is “RGB”.
Professional Option: This option is always displayed.
Color | Pixel colors
Use this option to enable setting the clipped black and white colors, the out of gamut colors and the infrared defect colors.
Professional Option: This option is always displayed.
Color | Clipped black color
Use this option to show the pixels that have at least one color clipped to zero intensity.
These colored pixels are not written to output files, but are displayed in the Preview and Scan tabs.
Professional Option: This option is displayed when “Color | Pixel colors” is set.
Color | Clipped white color
Use this option to show the pixels that have at least one color clipped to maximum intensity.
These colored pixels are not written to output files, but are displayed in the Preview and Scan tabs.
Professional Option: This option is displayed when “Color | Pixel colors” is set.
Color | Out of gamut color
Use this option to show the pixels that have at least one color component that is out of gamut.
These colored pixels aren’t written to output files, but are displayed in the Preview and Scan tabs.
Professional Option: This option is displayed when “Color | Pixel colors” is set.
Color | Infrared defect color
Use this option to show the defects found by the Filter | Infrared clean option.
These colored pixels aren’t written to output files, but are displayed in the Preview and Scan tabs.
This option is only useful when Filter | Infrared clean is enabled.
Professional Option: This option is displayed when “Color | Pixel colors” is set.
Color | All frames
This option makes all frames use the options in this tab, instead of applying the options separately for each frame.
Professional Option: This option is displayed when using multiple frames.